DodecaTimer
Project & Context
The DodecaTimer--a 12-sided interval timer that counts down (in minutes) the number on top--won AT&T's Best UI and Community Choice Awards at Hackster Hardware Weekend Portland. This was a 2-day, hackathon-style competition in which small teams form around pitched ideas, then rapidly develop a prototype.
This project gave me experience thinking through a non-screen-based user interface and allowed me to focus on elegant, tactile interaction design. Read on for my contributions to the project.
Human-Centered Design
In the early stages, while my teammates were wrestling with accelerometers and microcontrollers, I was keeping us focused on the end user, making sure the tech decisions would contribute to a simple, delightful experience.
Use Cases
Understanding that our product might appeal to a wide range of users, I focused on a few different user types and use cases:
Professionals alone in their office
Facilitators/teachers with a group
Children in home or classroom.
Requirements & Differentiation
With extremely limited design and build time, I gathered requirements based on a quick-and-dirty competitive analysis and best guesses about our use cases. My requirements listed below function as a guide for development and a working hypothesis on the best ways to compete with and differentiate our product from egg timers, smartphones, and The Miracle Cube Timer.
Size: must fit comfortably in hand.
We made it the size of a navel orange. Big enough to fit the hardware, small enough for a child to hold.Simplicity: should do one thing well.
As always, we were tempted toward feature creep. Programmability, wifi / Bluetooth connectivity, and an LCD display were all tempting, but we stayed focused on making a minimum viable product and keeping things simple and elegant.Power: should be battery-powered and easily charged, preferably with no extra cords or hardware required.
One side of the dodecahedron will be a solar panel to recharge the internal battery, making the DodecaTimer a single, self-contained object.Material: must be durable, attractive, and pleasant to touch.
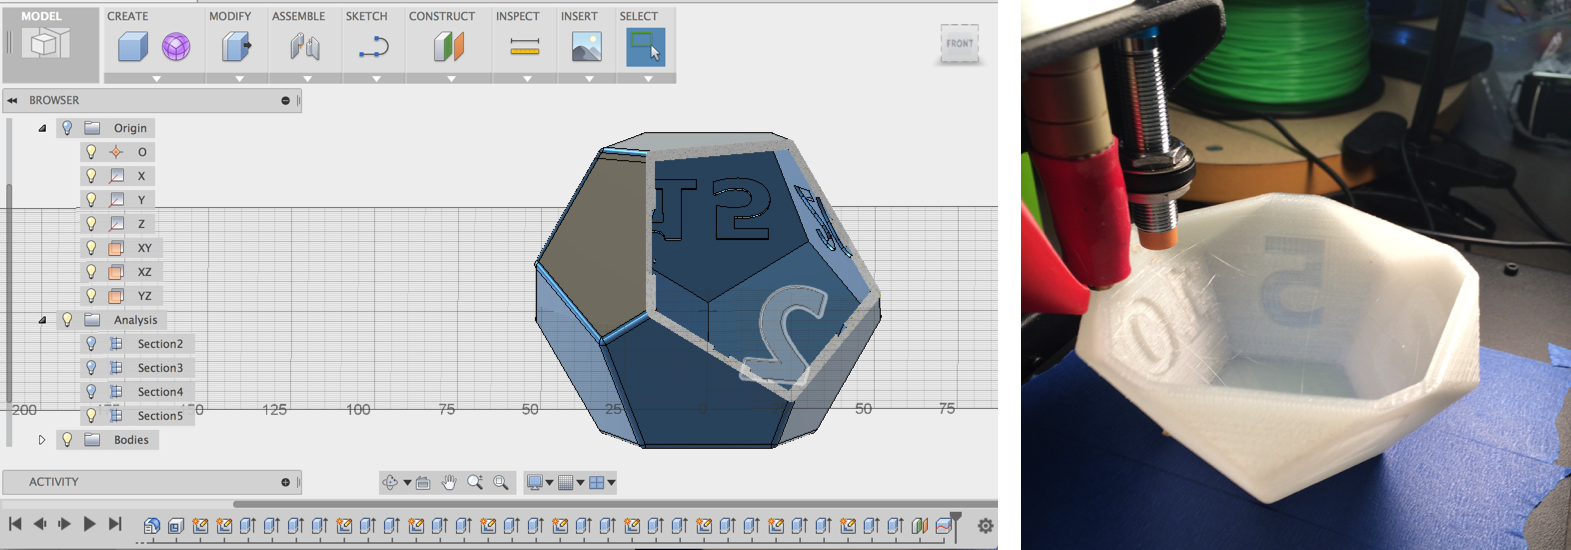
I 3D printed our prototype using translucent ABS plastic and sanded it smooth, but we will also experiment with other materials (see rendering above).Usability and Discoverability: must be easy to operate with little to no instruction.
The concept is already simple and the combination of size, tactile appeal, and durable/non-precious material encourage manipulation, experimentation, and discovery.Feedback: multiple users should be able to easily see, from a distance, how much time is left. Auditory cues should be reserved for the "time's-up" signal.
Shining diffusely through the translucent body, an RGB LED slowly changes color and/or brightness as the timer progresses. This makes it easy to gain a quick sense of timing without distracting the user with millisecond by millisecond precision. The user's activity is what's important, not the time. Finally, when the time is up, a pleasant but assertive noise indicates such, and the DodecaTimer flashes its final red.Visual Appeal: the object should be something people are proud to have in their space and want to show off.
Its unusual shape and pleasant color-changing glow make it unique among timers.
3D Design, 3D Printing
In addition to gathering requirements and keeping us focused on the user experience, I learned a lot about Fusion 360 to prepare the dodecahedron for rendering and 3D printing.*
Graphic Design and Storytelling
I also created a logo for our company, Hedron Timers, using Sketch. Finally, I helped present the human value of our product to the judges, in a non-technical way, telling stories from my own life.
What's Next?
There was a lot of interest in the DodecaTimer and development continues. From a UX standpoint, next steps will involve user research (observing people using their existing timers, interviewing them, researching most common/most desired intervals) and usability testing our prototypes. Stay tuned for news!
*Many thanks to Mike Aubry of Autodesk for his help with Fusion 360, and to Ken Olsen for his help 3D printing.


